What Happened When I Used A Rose Quartz Roller & Gua Sha For 2 Weeks
- Bailey Martindale

- Oct 18, 2020
- 6 min read
My last round of botox has finally worked itself out. I am due for more but I haven't found anyone I trust to inject me other than my dear friend and med spa owner back home in Oklahoma. I don't go back for another month, so I decided to try out some other at-home skincare rituals and get a better idea of their impact.
My friend Erica is an esthetician in Denver and she always shares fantastic skincare tips and tricks. Last year, she started talking about jade rolling and gua sha so I looked into it. I bought both items but I hadn't been consistent with them until recently.
First, let's understand the details of a gua sha facial and rose quartz roller. Gua Sha is great for manual lymphatic drainage, relieving facial and jaw tension, and lifting and contouring the skin. Facial Rolling is great for reducing puffiness, applying products such as serums or oils, and soothing the skin.


Here is the rose quartz roller and gua sha bundle I bought from Amazon
Rose Quartz vs. Jade
Both facial rollers and gua sha come in a few variations of stone or material. The most common two are rose quartz and jade. Rose quartz is best for calming and soothing while the jade is best for toning and defining.
Prized for its ability to relax muscles and provide balance, jade symbolizes beauty, prosperity, and grace. And in some cultures, jade is known as the stone of eternal youth.
Rose quartz has inherent minerals- silicium, magnesium, iron, sodium and oxygen- that skin can topically borrow and benefit from when rolling. Rose quartz stays cool whereas jade is adaptive in nature and tends to warm with skin contact. Rose quartz is better known for its wrinkle-reducing benefits. Because jade is a soft stone and can encounter wear and tear with repeated use, a rose quartz roller may last you longer
What is Gua Sha Gua Sha started as an ancient Chinese healing technique. A whole-body experience undertaken to reduce inflammation and promote healing. Practiced as a natural alternative facial therapy, it involves scraping your skin with a massage tool to improve circulation. The sweeping action stimulates blood circulation and encourages lymphatic drainage. They say with regular practice, facial tension is relieved, your jawline becomes more defined, fine lines are reduced and your skin is lifted and de-puffed. It’s even been reported this facial technique can help decongest the sinuses. Overall, the goal is to improve the look and feel of your skin.
What is Facial Rolling Facial Rolling is not a new modern beauty trend. In Style magazine reports, that they have been in use since the 7th century in China to improve health and circulation. As well as balancing the chakras, detoxifying the body, and encouraging harmony and prosperity.
Chakras aside, the act of rolling a jade stone over your skin will aid in lymphatic drainage and support an increase in blood flow. If you’re not familiar with the lymphatic system, according to Live Science, it is a network of tissues and organs that help rid the body of toxins, waste, and other unwanted materials. And it lies just beneath the surface of our skin.
Stimulating the lymphatic system, under the skin helps to flush out waste, eliminate puffiness, encourage a natural glow and smooth wrinkles.
5 Ways Facial Rolling Benefits your Skin Care Routine
The main benefit of facial rolling is to encourage drainage of the lymphatic system’s natural detox process. Often noticing an immediate improvement of reduced swelling and puffiness.
And the massaging by the facial roller leads to increased blood circulation – making your skin glow while releasing tension in the facial muscles, and improving skin elasticity. Over time you may notice your cheekbones look more defined.
Facial rolling Immediately cools and calms. Perfect for use after an at-home facial steam!
Additionally, facial rolling helps to erase dark under-eye circles and brightens the complexion.
Last, but not least, the massaging effect of facial rolling also helps to reduce the appearance of fine lines and wrinkles by tightening pores and stimulating facial muscles.
How to Gua Sha Gua Sha can be a combination of mindfulness, skincare and self-care. The idea is to slow down and be mindful in order to relax the nervous system.
I prefer to utilize the tool at night. Not only do I like the way it makes my skin feel, it also promotes relaxation as I am going through my nightly routine. There is a prescribed routine to get the most from the technique. I think it’s best described as starting at the neck and working your way up. Upwardly stroking each area around 3-5 times. Be sure to finish each stroke with a satisfying little massage wiggle in the hairline. The Gua Sha facial tool I received came with a helpful guide to the strokes, detailing which side of the tool to use for each area. It's really helpful to watch videos of professionals completing it in order to fully master the technique. I found the tutorial below helpful.

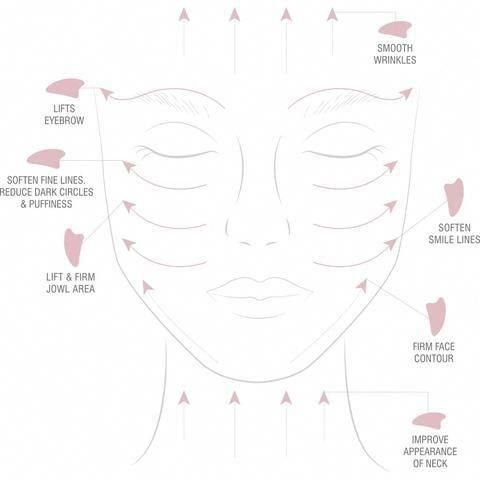

HERE IS HOW YOU DO IT STEP-BY-STEP: (Starting with the right side)
Neck: With the large inner curve towards the neck, work the tool upward towards your chin – 5-10x
Under the chin: Use the large inner curve to sweep from the middle of the soft under-chin (where a double chin would show up) out to the bottom of your earlobe. 5-6x
Jawline: Using the small inward curved section, from the middle of the chin, under the lower lip, sweep out to the earlobe. 5-6x
Cheeks: Using the small outward curved section, sweep from the corner of the nose out to the middle of the ear 5-6x. Switch to the big outward curved section and starting from the corner of the lips, sweep under the cheekbone towards the earlobe. 5-6x
Under-eye: Be especially light and slow here. With the small outward curved section of the tool, starting from the under-eye area, where "eye bags" would show up, sweep out towards the temple, all the way to the hairline - 5-6x
Brow area: Using the small outward curved section, sweep from the inner corner of the brow out to the temple. Avoid any pressure on the eye or eyelid itself and stay on the brow bone. 5-6x
Third eye (lower forehead): Use the large inner curve. Stroke from the center of eyebrows up to the hairline. This one is especially relaxing for the nervous system and great for insomnia and migraine, so do more strokes if it speaks to you! 5-10x
Upper forehead: With the large inner curve, starting from the center of the upper forehead, trace down the hairline, over the temple, then curve behind the ear, and down the side of the neck. 5-6x
Repeat Repeat the whole routine on the left side!
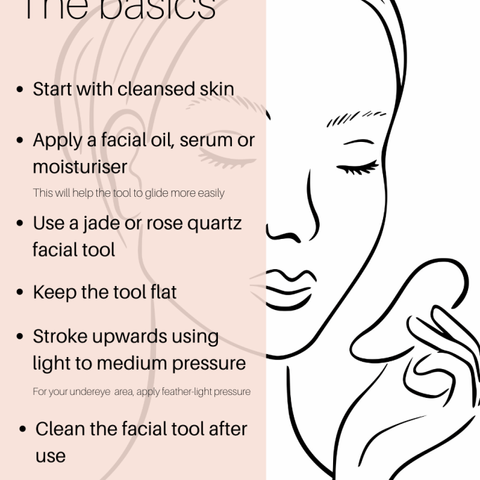
How To Facial Roll
Jade Roller Skin Care Routine Steps:
1. Always start with clean skin. Use my popular DIY aloe vera face cleanser for a clean start!
2. Then apply facial toner to lift impurities and balance the PH of the skin with reusable cotton round (learn how to make one here).
3. Next, apply a tightening eye cream under your eyes and below the brow bone, this my homemade version that works so well!
4. After that apply 3 to 5 drops of your favorite glow serum just before you start jade rolling.
Neck Area:
Start at your collarbone and gently roll upward toward your jaw using the large jade stone. Stop when you reach it and move the jade roller over to the next section on your neck. (Rather than rolling back downwards.) Repeat until you’ve covered the neck area – collarbone to collarbone.
Jaw and Chin Areas:
Continue with the large jade stone and start at the base of your chin at the jawline. Roll outwards and upwards toward each ear lobe. (Again do not roll back, downwards.) Then move the roller up higher on your chin and roll towards your temples and the hairline at the top of your ears.
Above the Mouth Area:
Flip the jade roller and use the smaller stone for this area. Start above your lip just under the nose and roll outward and upward toward your temples again. This area can often use the most lift anyway… Repeat for each side.
Cheek Area:
Return to the large stone for the large cheek area. Place the stone at one side of your nose, near the base and roll to the temples again. Can we say chiseled cheeks 3 times fast? Move the roller up a notch on the side of your nose until you’ve rolled out the entire cheek area, except for just under the eyes.
Under Eye Area:
Now for the under eye area, my favorite part! Use the small stone here and roll from the side of your nose just under the eyes ever so delicately (I always wanted to say that) pulling up to the edge of your eyebrow and on up to your hairline. You can roll the area under your eyebrows and your eyebrows if they are puffy or need lifting in the same manner.
My Results after 2 weeks of gua sha and facial rolling - My eyes seem to be more open and awake looking with continued use
- Smoother skin
- Slightly more defined and contoured jawline
- Relaxed facial muscles
- Better lymph and sinus flow/drainage
- Less puffiness
- Less redness
- Better product absorption
Let me know if you get a set and what you think!


Comments